2.1kviews
用了新浪微博之后就不怎么想写blog了,这一晃就是4个多月,用了这么久的微博,发现这东西跟博客还是不是一类东西,博客还是可以写一些比较系统的,有深度的东西,所以看来以后这个博客还是不能省,只是更新肯定不如之前频繁了,好在新浪微博对Wordpress双向的插件很多,互相同步非常方便,这样也算是个互补吧。
受一个CCFer的帖子的影响,用599买了一个七寸的IMITO IM7,买的时候发错了版本,老版本的电阻屏很难用,后来准备升级ROM的时候发现这东西不对,卖家在QQ的群里倒是很爽快,直接让寄回去换,邮费花了30,换了一个红色的加送了一个电源,而答应送的OTG线和耳机则未见踪影,不过也无所谓了,后来发现卖家后面的技术实力还可以,居然2.2很快出来,而安卓2.3.3也很快就出来了,虽然跟自己在QQ里声明的日期是一再跳票,但最终出来也算不错,没见那么多主流大厂的产品N年都升级不上来吗?呵呵。。
============华丽的分割线 – updated at 2011.11.12 ===============
Today there is a Russian guy get into support QQ group and asking about IM7 ROMs, he said he follow my instruction here and make his device became a brick, and after I discussed with him I found I should put the English translation here instead of let non-Chinese people use Google translator to read my instructions, so that’s why you see the English translation here. if you like the instruction and enjoy the new version of Android on your device then please click once or twice ADs for thanks. ====================================================
虽然ROM升级的不错,但文档实在是很糟糕,偶摸索了一下,觉得其实步骤很简单,但卖家这方面出奇的懒,甚至在偶跑到群里随便发言了关于WiFi的刷机方法之后把所有WiFi相关的问题都推给了偶,这种极不负责的态度是必须BS的。。嘿嘿。。不过看很多人都在问到底怎么刷啊,偶觉得是有必要把自己的经验共享一下,下面就是偶的刷机手册,嘿嘿,有机会偶可以翻译成英文,但这要看卖家给什么甜头了,哈哈哈。。
不清楚的小图,点击一下小图,就有大图出现了,切记切记。。。
If you can’t see the picture clearly, please click it then you will see the big pictures, the chars on picture won’t be translated on picture but I will try to put them in text somewhere
==IM7刷机手册 – IM7 Flash Instructions ==
1。准备工作:刷机前必须要下载刷机工具,要刷的ROM,还有本手册,有了这三样,加上你的IM7本本和一条MiniUSB的线还有充电器,就可以开工了。偶这里不提供这些刷机工具和ROM,有需要的找你的卖家,或者到QQ群:144638829 的共享里去下载。截至发布本文为止,最新你的版本应该是5月30日发布的2.3.3. 我这里的环境是Windows XP SP3 英文版,下面步骤里的信息你根据你自己的操作系统进行调整。
1. Prepare : Before you start to flash your IM7 devices you need a flash utilities, downloaded new ROM and this instruction, but that’s not all, you also need IM7 pad, MiniUSB data cable and pad charger, then you can start your flash work. I won’t supply flash utilities and ROMs, if you need them you need ask your devices’ seller or go to QQ group 144638829, find these from there. currently my newest version is 2.3.3 which released at 30th of May 2011, my flash environment is Windows XP SP3 English version, following instruction you have to adjust based your local OS. (following picture show flash utilities in red color text, black color means newest ROM)  2。第二步是运行刷机工具进行配置刷机参数和选择刷机包,这个步骤很重要,做的不对很有可能影响你的WiFi是否能够使用。
The second step is run the flash utilities, start to configure flashing parameters and select which ROM you want to flash, this step is very important, if you make things wrong, then your WiFi will constantly get dropped.
- 双击刷机工具的“FWDN_V7_v2.13.exe”,然后得到下图所示 Double click flash utilities “FWDN_V7_v2.13.exe”, you will have following screen:
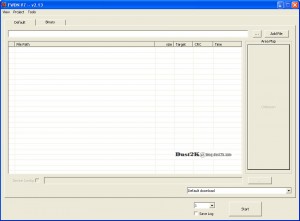
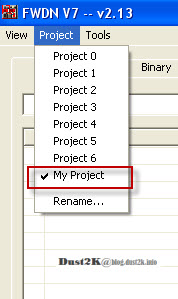
- 点击菜单“Project”,选择“My Project” Click menu item “Project”, then select “My project” like following picture
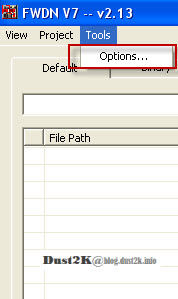
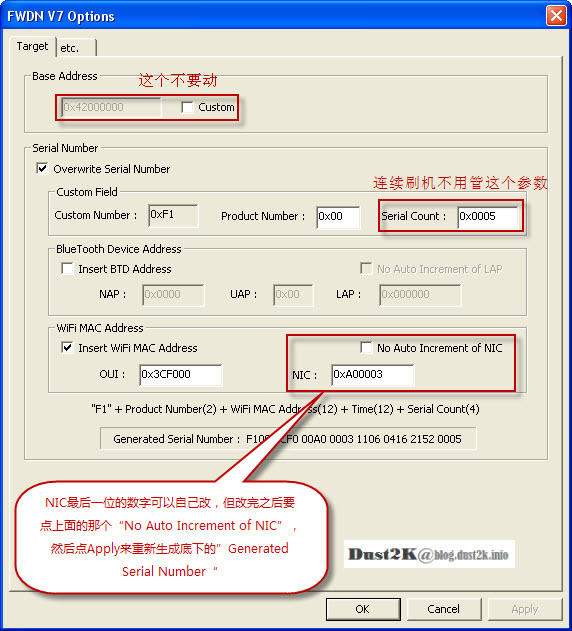
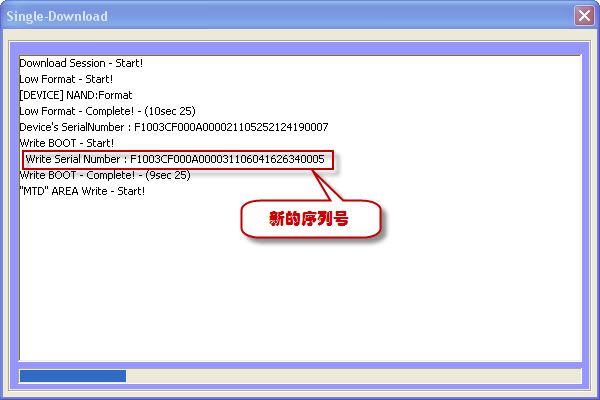
- 点击菜单“Tools”,点“Option”,出如下窗口,窗口参数中“Base Address”不选,底下选上“Overwrite Serial Number”,这时候在底下输入数字的输入规则按照我的图示的解释,但最后都需要点击“Apply” 去生成最下面那行写进去的字符串。 click Menu “Tools”, then click “Option”, you will have following window, the parameter “Base Address” should not be selected or changed, then goes to “Overwrite Serial Number”, now you have to tick “Overwrite Serial Number”, then goes to “Wifi MAC address” field, don’t change the “OUI” default value, but you can change the last digits of NIC fileld, remember every time you have to tick and un-tick “No Auto increment of NIC” if you change “NIC” field, after you’ve done all parameters then you can click “Apply” button to generate serial number.
- 这时候开始选择要刷的ROM文件,按图示选择添加三个ROM文件 “lk.rom”,“tcc8900_mtd.img”,“NAND Data.fai”。 Now it’s time to select which ROM you want to flash, follow the next picture go to ROM directory, then select and add three ROM files “lk.rom”, “tcc8900_mtd.img”, “NAND Data.fai” to list.
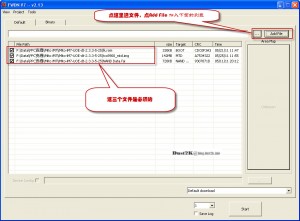
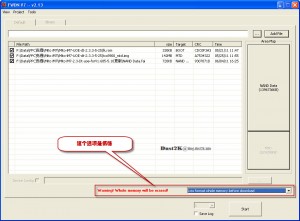
3。把你的IM7关机,然后插上充电器,插上MiniUSB的数据线,另一头插到计算机的USB口,然后按住机器后面四个小键最里面一个“M”标志的键,这个键就是“Menu”键,按住M键的同时然后按开机键,持续几秒种,屏幕上会闪现一个初始化的小窗口,如果之前没有装USB驱动,这个时候也许会要求安装驱动,就使用刷机包里带的驱动就可以了,然后驱动安装完之后,应该如下图所示: Switch off your IM7, then plug the charger start to charging your device, connect your device with your computer by using the MiniUSB cable, then hold the small button with “M” on it at back of your IM7, the button actually is Android’s menu button, hold menu button and press power button to start your IM7, after few seconds, you will see your computer screen will pop up a initialization windows, if you didn’t install the USB driver before, windows will ask you to install driver, you can install the driver which is in flash utilities package, after the driver installed you will see the following screen (red color text in picture saying if the devices is ready to flash then that “NAND Data” will from disabled grey color to enable status).
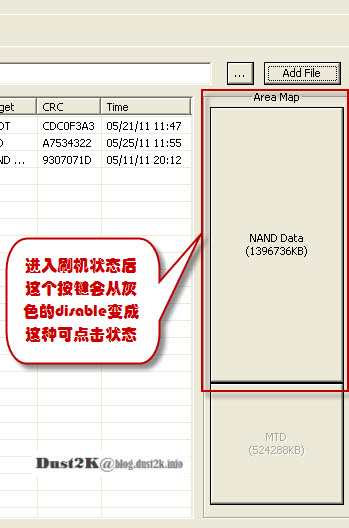
4. 这时候点击“Nand Data”键,弹出窗口,如下图配置:
Now you can click “NAND Data” button, a window will be pop up, just like following picture. (red color text saying : the file’s path must be same as last picture’s file “NAND Data.fai” ‘s path.) 
5. 配置完成后,点击“Create Image”,回到主界面,这时候底下有一个选项,是让你决定刷机前是否低格Nand,选了就低格,不选就不低格。
Once you finish the configuration, then click “Create” Image to come back previous screen, now you have a option at bottom, the option means before flash new ROM do you want to do the low level format to your devices, you can tick it.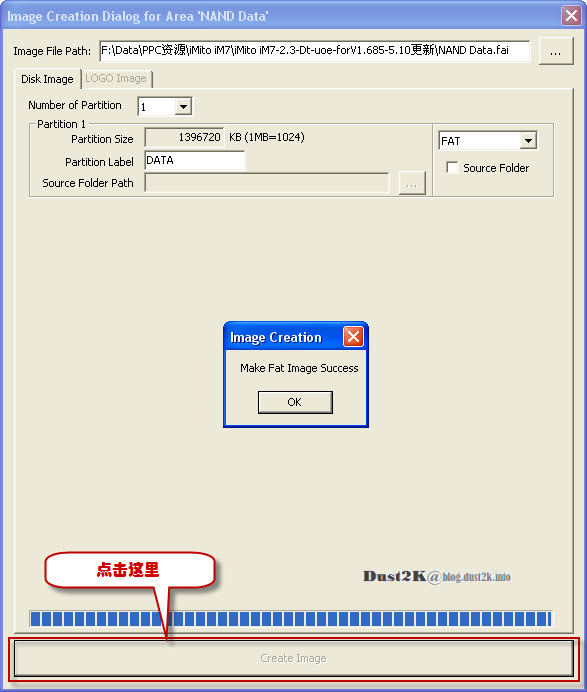
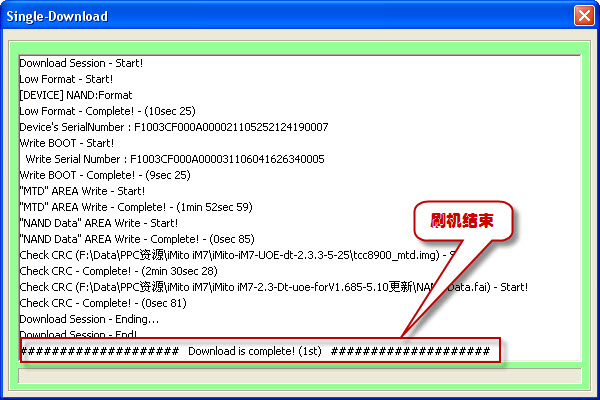
6,点击“Start”,开始刷机。刷机结束后如下图所示
Now you can click start, the flash process started, after all done, you will see the following pictures. 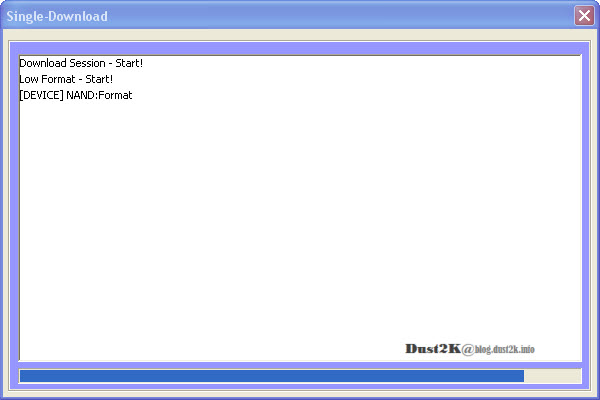
7。点击“reset”小孔里的键,重启机器,等待新ROM的启动吧。。 Now you need use a pin to click reset button in a small hole, restart your IM7, wait the new ROM loading.
如果你以为现在就万事大吉了,错!!! 这个ROM有一个非常弱智的设计,所以重启之后你要紧盯着你的屏幕,直至屏幕校验的窗口跳出来,在这之前严禁在屏幕上做任何点击,因为你的点击很有可能导致你的屏幕不可用而必须再次重新刷机,等到绿字黑底的校验屏幕出来之后,仔细的点击五个验证点,这时候你才算终于成功了,可以享受这个本本带给你的快乐和痛苦了。。
If you think you are all good now, NO !!! the IM7’s ROM has a very stupid design, once you IM7 is starting, you have to watch you IM7’s screen very carefully, you MUST NOT touch your screen unless the screen calibration interface (green text with black background) is coming out, do the screen calibration carefully, if you touch screen before screen calibration interface comes out, then your screen will not be usable, you have to redo the flash again. Once you’ve done this step then you can start to enjoy your IM7.
看到有新版本,很激动的一边刷一边想,正好可以刷新ROM的时候把教程顺便做了,可是不知道怎么回事,刷机一切顺利重启后,居然无法进入下一个界面,只是在白屏和小企鹅之间反复重启,唉,悲剧了,没办法拆电池,reset不管用,刷了所有的版本都不好使,之后把电源扔在那里让它耗电耗完,结果是耗完之后重启刷机,居然好了,哈哈,这也算是一个小小的花絮吧。。
PS : After few times flashing ROM, suddenly my IM7 can’t boot up properly, always stay on first screen, then reboot between white screen and small penguin, too sad to continue, reset doesn’t work, flash all other ROM doens’t work, can’t pull out the battery, so I have to leave it until battery exhausted then recharge the IM7 with a new flash ROM, wow, everything goes back!!!
.
.
======ROOT的手册 How to root your IM7======
.
看到很多人问到ROOT的问题,至少到5月30日 放出的版本都可以ROOT,具体ROOT的过程如下。
There are lots of people ask how to root IM7 in QQ support group, so I write the step show how to do it, at least all ROM up to 30th of Mar should be fine for this method.
.
1. IM7开机,插入USB数据线,电脑提示发现什么VTC xxxx 什么芯片之类的,要求装驱动,从刷机包里装好USB的驱动之后,电脑会提示你驱动安装好,设备已经可以使用。你从Control Panel的设备列表里能看到下图: Start IM7, connect MiniUSB data cable to computer, computer will have notification saying “VTC xxx chips xxx”, then looking for a driver, point to flash utilities’ USB driver and install, after installation success, you will see following devices in your control panel’s device list.
.
.
2. 下载Superoneclick 1.91,工具是从xda-developer的一个大拿放出来的,自己去网上搜索着下一个,解压后如图: Download Superoneclick 1.91, I’ve got it from xda-developer site, you can search on google and download it.
.
.
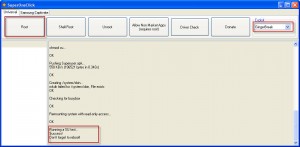
3. 双击那个SuperOneClick.exe, 然后如下图所示,先选择GingerBreak,然后直接点 最左边的ROOT键,应该在10秒钟之后就有提示说ROOT成功,是否需要su测试之类的,点击需要,测试成功后问你要不要捐款,说不要,结束,重启设备,至此,你的机器ROOT搞定。。。 Double click SuperOneClick.ext, then you will have a windows like next picture, select “GingerBreak” at right side, then click “ROOT” button, then after 20 seconds, it will shows root success, do you need a su test, then will say success, and ask you want to donate, no, then reboot the device, now you got your IM7 rooted.
.
.
如果还有什么问题,在这里留言吧,或者去QQ群里再问。。
If you still have question, please register here and leave your question here or go to QQ support group, you will find me there every day.
 2。第二步是运行刷机工具进行配置刷机参数和选择刷机包,这个步骤很重要,做的不对很有可能影响你的WiFi是否能够使用。








醉酒你写的真好 。真好。啥时候出个英文版的呢。
太累了,没动力啊,呵呵。。
Thank you so much for the info. So far your post is pretty much the closest solution on the web. I do have one question though. I recently flashed my iMitO7 with the instructions provided with total success except for one thing, my touch screen does not respond. I waited for the calibration screen to pop up (without touching the screen beforehand) and still no luck. I’m currently using iMito+iM7+-ST-ROM-2.3.3_UOD unfortunately the other two (iMito+iM7+-ST-ROM-2.3.3_UOE and iMitoiM7-2.3-DT-UOE-2011.6.8 seem to both give me errors. I tried locating the QQ Group you recommended but no luck so far. I purchased my iMitO7 from lightinthebox.com if that helps any.
Any suggestions?
謝謝你這麼多的信息。到目前為止,您的文章幾乎是在網絡上最接近的解決方案。我有一個問題。我最近總的成功提供除了一件事說明閃過我iMitO7,我的觸摸屏不響應。我等待校準屏幕彈出(無需事先觸摸屏幕),仍然沒有運氣。我目前使用iMito+ IM7+ ST- ROM2.3.3_UOD不幸的是,其他兩個(iMito++ ST- ROM的2.3.3_UOE和iMitoiM7- 2.3 – DT- UOE2011年6月8日IM7似乎給我的錯誤我試圖尋找你推薦的QQ群,但沒有運氣到目前為止,我從 lightinthebox.com購買我iMitO7如果這可以幫助任何。
有什麼建議?